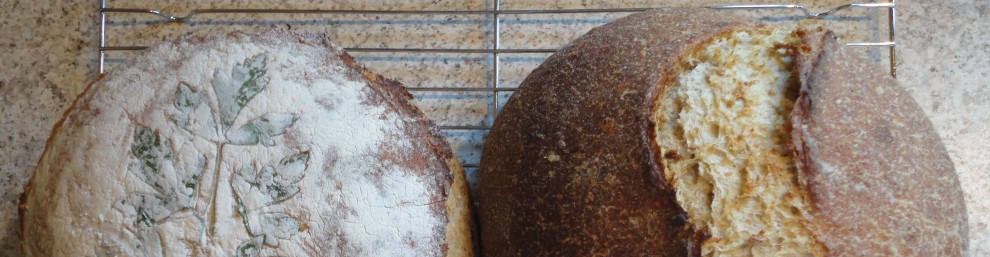
My amazon order arrived Friday and amongst the goodies was a copy of Peter Reinhart’s ‘The Bread Baker’s Apprentice’. This is a great book that is written in such a way that I feel like the author is standing over my shoulder watching and instructing as I bake. Much of this book is geared toward teaching skills, knowledge and formulas that provide a platform from which a baker can create. I love that Reinhart understands the science of baking and isn’t afraid to communicate it (for a taste of this watch his TED lecture). Inspired, I tried one of his formulas this weekend – Basic Sourdough Bread. One half I left plain and through the other half I folded blue cheese and walnuts. The final product of this formula was a light open crumb sourdough that is not particularly sour. It seems a very good sandwich and toast bread, but is not a sour as the Norwich or Norwich-more that I have been baking for the last month or so. The milder flavor, however, seems to make it well suited to flavoring with cheeses.
I served the blue cheese and walnut loaf still warm from the oven with honey and fresh pear as a desert. I think that this would also be divine with figs or caramelized onions or even with pear slices that have been spiced and caramelized in a pan. This loaf has been YeastSpotted.

Reinhart’s Basic Sourdough Bread with Blue Cheese and Walnuts This recipe was published in imperial measurements and has been converted to metric with Swedish rounding applied.
Yield
2 medium loves
Timing
2-3 days total
Firm starter:
– 4 hours rise
– overnight retard
– 1 hour benching
Final dough:
– 15-30 min mix and kneed (by hand)
– 3-4 hours ferment
– 10 min shape
– 2-3 hours proof (or retard overnight and rest for 4 hours on bench before cooking)
– 20-30 minutes bake
Ingredients
Firm Starter
113 g (4 oz) bram (I replaced this with a 100% hydration starter)
128 g (4.5 oz) unbleached bread flour
28-56 g (1-2 oz) water
Final Dough
574 g (20.25 oz) unbleached bread flour
14 g (0.5 oz) salt
340-397 g (12-14 oz) lukewarm water
Additions
about 80 g firm blue cheese
2 handfuls of walnuts
Directions
Day 1 – PM
Add the 100% hydration starter and flour together with just enough of the water to form the mix into a dough. Kneed into a small, firm ball. Work for only as long as it takes to distribute the starter and water evenly. Brush or spray the inside of a small bowl with oil, pop the dough in and coat with oil. Seal with cling-film and rest on the bench for 4 hours or as long as it takes to double in size. Once it has doubled in size place in the refrigerator overnight.

This pic shows the firm starter before it has been set aside to rise for 4 hours before refrigeration.
Day 2 – AM
Remove firm starter from the fridge 1 hour before you want to make the dough. Turn out on a lightly oiled surface, cut it into 10 pieces, coat with spray oil and cover with cling-film or a towel.

The starter in the morning before it was turned out and sliced into pieces.

I love the texture of this starter: weird spongy life.

Lots of activity on the kitchen table. The starter chunks resting while a batch of sourdough English muffins are rising.
Stir the ‘final dough’ flour and salt together in a large bowl, add the starter pieces and only enough water to bring the dough together. At this stage I only added 350 g of water. Bring the dough together with a large metal spoon. Turn out onto a lightly floured surface and kneed until the dough passes the window pain test (approximately 15-20 min) adjusting with flour or water to obtain a firm dough that is still pliable and tacky. Place the dough in a lightly oiled bowl, coat with oil, cover with cling-film. Ferment at room temperature for 4-5 hours or until the dough has nearly doubled in size.

Mixing lumps of starter, like adding little gems of flavor and life.

Just enough water was added to bring it together. This ropey pile was turned into a smooth lump in no time.

The final dough should be smooth, firm and a little tacky, and should pass the window pane test.

The window pane test involves stretching a 1 tablespoon sized lump of dough out. If you can form a translucent membrane the dough has fully developed gluten. If you have a membrane with a few thick bits the gluten is moderately developed. This recipe asks for full gluten development, but I don’t think I got it quite there and it still turned out ok.

The dough after 4 hours fermenting at room temperature. In the winter when my kitchen is a little cool, I put the dough in the top of my hot water cylinder cupboard. If you don’t have one of these you can put the dough in the oven with the oven light on.
Day 2 – PM
When the dough has nearly doubled in size, gently remove it from the bowl and divide into 2 halves using a cerated knife (or portion out to make rolls if you wish). Try to avoid over-handling or compressing the dough so you retain as may air pockets as possible. Shape and place into a parchment lined tray, into a loaf tin or, if you are lucky enough to have them, into couches. I left one loaf plain and the other I stuffed with walnuts and blue cheese by carefully spreading out into a lose rectangle, topping with the fillings and gently folding it a few times to incorporate without knocking too much of the air out. At this stage you can either proof for 2-3 hours then bake or retard in the refrigerator overnight. If you retard the dough, it needs to rest on the bench for 4 hours before baking.

When the dough had finished fermenting, I gently turned it out onto the table while taking care to squeeze the air out of it. The top was smooth (see photo above) but the underside shows all the signs of life.

Being as gentile as possible, I spread one half of the dough out and topped it with walnuts and lumps of blue cheese. I folded it a few times aiming to end up with a loaf shape.

The two loaves shaped and ready for proof (and a sneaky walnut peeking out the top).
Day 2 – late PM or the following day
At least half an hour before you want to put the bread in the oven, prepare the oven for baking. I place a tray of scoria in the base of my oven and a pizza stone half way up, and turn the oven to maximum (230 degrees Celsius). Before putting the bread in the oven, score it with a pattern for decoration and to allow expansion room. The walnut and blue-cheese loaf I just slashed with a cerated knife. The plain loaf I snipped with scissors to crete a spiky pattern. The loaf in the tin I placed in the oven as is and the round loaf was slid onto the pizza stone with the piece of parchment it was proofed on. Poor 1/2 cup of water over the hot rocks (I use a watering can to do this so as to avoid burning myself). Turn the oven down to 200 degrees Celsius (classic bake, not fan bake) and bake with steam for 10 minutes (i.e., don’t open your oven door). The steam is required to help the crust achieve a golden brown color. If you do not have a tray of scoria, you can try using a large cast iron pan instead. Misting the walls of your oven with water from a spray bottle may also work, but needs to be done a few times over during the 10 minute period. After 10 minutes, remove the tray of scoria and bake for a further 15-30 minutes or until the crust is golden and the loaf sounds hollow. Cool for at least 45 minutes before cutting.

This method of decorating the loaf is another gem from Reinheart’s tome. I love the hedgehog look, but next time I would like to try fewer spikes that are larger and deeper than these ones.


